Shelley's Patterns

Free Knitting Patterns

Friday, March 03, 2006

Top-down V-neck sweater

This sweater is worked from top-down. After the raglan increases the sleeve stitches are put on holders and the body is finished. Then the sleeve stitches are picked up and the sleeves are worked down. No seams!! The only finishing is weaving in the ends of the sleeves, waist and neck. This pattern is for a size s/m and it is oversized to boot. In other words, it a BIG sweater! You can easily adjust the size by making fewer or more raglan increases. Just make sure to buy enough yarn if you're going to make it bigger.

Materials:
7 skeins super bulky hand-painted yarn (approx 455 yards)
2 skeins of mohair to coordinate for cuffs and trim
Circular needles 16" and 29" and dpns in size 15 [or size to get gauge]
6 stitch markers - 2 in one color, 4 in another
2 stitch holders, or waste yarn

Gauge:
10 stitches = 4 inches in st stitch

Body:

Until the bottom of the "V", you will be using your longer circular needle and working back and forth in st stitch (knit RS , purl WS).

Using the larger circular needle cast on for the neck as follows, making sure to place your markers which will indicate your sleeve and neck increases:
CO 1, pm A
CO 1, pm B
CO 6, pm B
CO 15, pm B
CO 6, pm B
CO 1, pm A
CO 1

Working back and forth, increase by knitting into the front and back of the stitch before and after each B marker on every right side row. At the same time, increase at the beginning and end of every 5th row until there are six stitches between the end of the needle and marker A. End with a RS row.

You will now put the sleeves on holders or waste yarn and continue working on the body in the round. This will be your beginning of the round so you should take out the other markers as you go. Knit to the first B marker, slip all of the stitches from there to the next B marker on a holder, cast on 4 stitches and join to the back, kitting to the next B marker. Slip all of the stitches from there to the last B marker on a holder, cast on 4 stitches and continue knitting. You will need one skein (65 yards) to finish each sleeve, so just keep on working until you have either finished your 5th skein or you get to about 2" from where you want to start the trim. Using your mohair and holding 2 strands, knit 4 rows even, then purl a row, knit a row, purl a row and bind off knitwise.

Sleeves:
Using the smaller circular slip all of the stitches from the holder or waste yarn onto the needle, pick up four stitches under the arm placing a marker after the second stitch. This is your beginning of the round.

Knit four rows even. Next row K1, ssk, knit to 3 stitches before the marker, K2tog, K1. 2 stitches decreased. Decrease this same way every 6th row 4 times, then every 4th row 2 times, changing to DPNs when needed. 27 stitches.
Knit two rows even, then change to mohair and holding 2 strands, knit 2 rows even.
Next row: K3 M1 (K4 M1) 5 times, K3. 33 stitches
Knit 3 rows even
Next row: K4 M1 (K5 M1) 5 times, K4. 39 stitches
Knit 3 rows even
Next row: K5 M1 (K6 M1) 5 times, K 4. 45 stitches
Purl 1 row
Knit 1 row
Purl 1 row
BO knitwise

Neck edging:

Holding two strands of mohair together, pick up stitches as follows starting at back right of neck:
15 along the back of the neck, 7 down the sleeve, 25 down to the point of the V, 24 up to the sleeve and 7 along the other sleeve. Join at the neck and, depending upon how revealing you want the neckline, work a few rows even then finish as the other edges with P 1 row, K 1 row, P 1 row and BO knitwise.
Monday, October 03, 2005

Dragonfly Purse


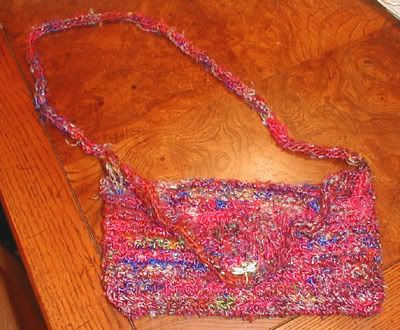
I call this the Dragonfly Purse simply because I chose a dragonfly button. It's super simply to make but uses both knitting and crochet. It could be done in just one or the other, but I find that it's easier to crochet for the body, and that the ruffle looks better knit, and I am just a huge fan of I-cord. So .... you need both skill to make it as it is pictured above.
Materials
1 skein recycled Sari Silk (about 180 yards)
crochet hook size J
straight needles size 8
DPNs size 8 (for I-cord -- you could use 7's as well)
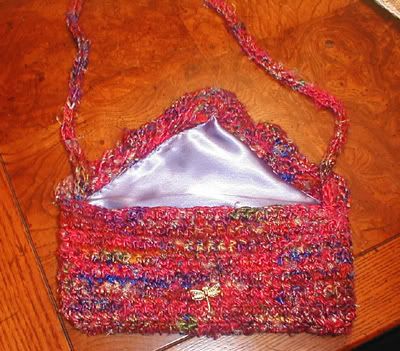
Satin for lining
Plastic needlepoint canvas for backing
Button

Body of purse
Starting at the point of the flap:
Row 1: ch 1, 3 sc in chain, ch1, turn
Row 2: 2 sc in first chain, sc in next ch, 2 sc in last ch (5 sc), ch1, turn [2 stitches increased]
Repeat Row 2 until desired width of bag. (If you are using just one skein, I suggest you make it not more than 8 or 9 inches across. )
Continue for body of the purse sc across until you can fold up the purse in 3 parts, with the flap nearly to the bottom. The sides of the purse in the picture are about 4 inches.

Ruffle
Using your knitting needles and the right side of the bag facing, pick up stitches evenly around the edge of the flap. I wanted to make sure I had enough silk for the I-cord. If you don't want a long handle or you just want to make it a clutch, or if you want to add a wooden handle you can make the ruffle longer than 4 rows. This is how I did it in the picture.

Row 1 (WS): purl around
Row 2 : Knit into the front and the back of each stitch across
Row 3: purl around
Row 4: bind off

Handle
With your DPNs, make a 3-stitch I-cord as long as you want the handle to be.

Finishing
With right sides facing, fold the purse so that the flap starts where the increases end. Crochet the sides together using single crochet. Turn the purse right side out and sew the I-cord to the inside of the bag along the seam. Place the button where you want it to be on the front of the bag and sew it from the inside. Turn the back inside out again and sew in the lining.

Friday, September 23, 2005

Felted Basket


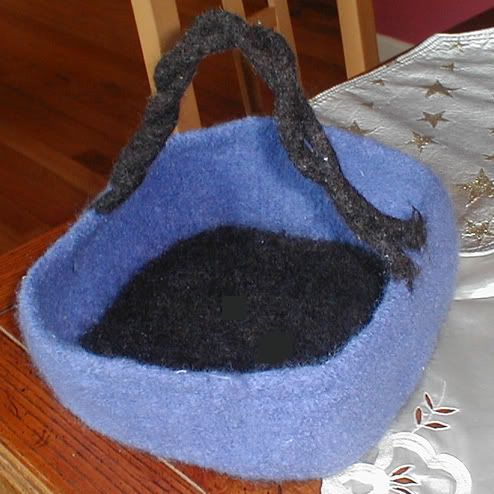
This is a handy basket for hauling around your UFOs . I like it because it's shallow and can easily hold most of any project. As shown, the sides are approximately 3 1/2 inches high.

Materials
2 skeins Elann's Highland Peruvian Wool in Coffee
4 skeins Elann's Highland Peruvian Wool in Dusky Lavender

Size 11 DPN and Size 13 circular needles

Gauge
Unimportant


Working with two strands throughout, with DPNs and the darker yarn, cast on 8 stitches, leaving a long tail. Divide the stitches between 4 needles, 2 to a needle. Being careful not to twist, knit each stitch around.

Next round, increase one stitch at the beginning of each needle by knitting into the front and back of the stitch - 12 stitches (3 on each of the four needles). Continue in this manner, increasing in the first stitch until there are 30 stitches on each needle (120 total). Next round change to the size 13 circular needles and purl two rounds. Then change to your contrasting color, still working two strands of yarn together, and knit until the sides of the basket measure 7 inches. You will have yarn left over, so if you'd like your basket to be deeper, just keep going. When you are satisfied with the height of the basket, purl two rounds and then bind off.Using the long tail, weave through the hold in the bottom of the basket. Weave in, or knot and cut closely (the felting will take care of the ends) the loose ends.

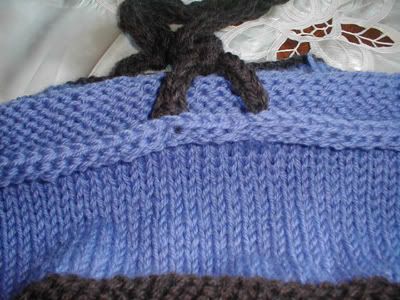
For the handles, make two I-cords using the darker yarn. If you are making the shallow basket pictured, make the handles 30 inches long. If you are making a taller basket you'll have to just figure out how much shorter you want the handles. They will shrink about and inch or two. When you have your two I-cords, tie the two together with an overhand knot, leaving two tails about 3 inches long. (This close up shows the unfelted basket with the handles attached to the purled ridge at the top.) Fold your basket in half and measure a side to find out where the center point it. Mine was 23" a side so my center point was at 11 inches. I centered the knot there and sewed the little tails evenly on each side. Twist the I-cords together, knot the other side and repeat.

To felt, put the bag into a lingerie bag or a pillow case. Set your washing machine on small load, hot wash, add a little detergent and toss in a couple of towels or a pair of jeans. I put mine through a 12 minute cycle and it was perfect. You might have to check a couple of times to make sure it is felting to your liking. When it has finished rinsing and spinning, take it out of the bag, shape it and stuff it with newspapers and set it out to dry.

I'd LOVE to see pictures if you make one. Please leave a comment where I can see them.