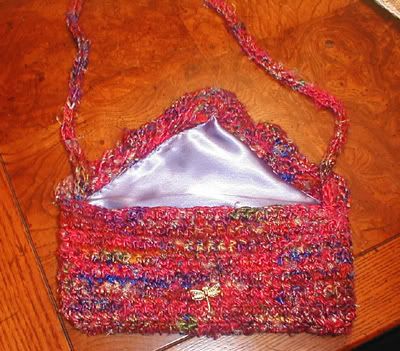
Dragonfly Purse

I call this the Dragonfly Purse simply because I chose a dragonfly button. It's super simply to make but uses both knitting and crochet. It could be done in just one or the other, but I find that it's easier to crochet for the body, and that the ruffle looks better knit, and I am just a huge fan of I-cord. So .... you need both skill to make it as it is pictured above.
Materials
1 skein recycled Sari Silk (about 180 yards)
crochet hook size J
straight needles size 8
DPNs size 8 (for I-cord -- you could use 7's as well)
Satin for lining
Plastic needlepoint canvas for backing
Button
Body of purse
Starting at the point of the flap:
Row 1: ch 1, 3 sc in chain, ch1, turn
Row 2: 2 sc in first chain, sc in next ch, 2 sc in last ch (5 sc), ch1, turn [2 stitches increased]
Repeat Row 2 until desired width of bag. (If you are using just one skein, I suggest you make it not more than 8 or 9 inches across. )
Continue for body of the purse sc across until you can fold up the purse in 3 parts, with the flap nearly to the bottom. The sides of the purse in the picture are about 4 inches.
Ruffle
Using your knitting needles and the right side of the bag facing, pick up stitches evenly around the edge of the flap. I wanted to make sure I had enough silk for the I-cord. If you don't want a long handle or you just want to make it a clutch, or if you want to add a wooden handle you can make the ruffle longer than 4 rows. This is how I did it in the picture.
Row 1 (WS): purl around
Row 2 : Knit into the front and the back of each stitch across
Row 3: purl around
Row 4: bind off
Handle
With your DPNs, make a 3-stitch I-cord as long as you want the handle to be.
Finishing
With right sides facing, fold the purse so that the flap starts where the increases end. Crochet the sides together using single crochet. Turn the purse right side out and sew the I-cord to the inside of the bag along the seam. Place the button where you want it to be on the front of the bag and sew it from the inside. Turn the back inside out again and sew in the lining.
posted by Shelley @ 9:01 AM
![]()
![]()


0 Comments:
Post a Comment
<< Home